
Tips for taking better travel pictures
You finally book that trip and step off the plane. After a full day of sightseeing and enjoying the nightlife you wake up and swipe through your photos to realise you didn’t take any good pictures! Don’t get me wrong there is more to life than taking pictures and of course you should enjoy the moment. But here are some tips to prepare you for next time.
Clean your equipment
It sounds pretty basic right but many forget to do this. Especially when your phone has been in your pocket/bag all day. Most photography brands such as Nikon or Canon you can buy special lens cloths. But for those with a phone even just using a simple fabric such as your t-shirt will do a much better job then your jeans. Coarse materials can potentially damage the lens.
Rule of thirds
One of the most ‘well-known’ rules within photography for composition. This is when a grid is made up of 3x3 lines, basically 9 squares - the subject of the image should be either on the lines of the grid or within an intersection. This is not a strict rule for which every photo should abide by but more of a guideline when struggling with composition. All DSLR cameras have a function to change your grid proportions and most phones also have an option to add a grid to your camera too:
iPhone = Settings > Camera > Grid
Android = Camera > Settings > Grid
Nikon DSLR = Menu > Setup > Display > Grid Display > On
Canon DSLR = Sub Menu > Shooting info display > Grid display
Note: every different model of Nikon and Canon camera may have a slightly different way to add a grid.
Of course photography is a creative matter with subjectivity, there is no right or wrong way to take a photo but having a grid can really draw attention to the subject of your image.
Look for light
No one looks good when the camera flash has been turned on, red eyes and bright white foreheads mean the subjects were too close to the lens!
Look for natural daylight and if possible try to stand in the shade making sure your subject is in the light.
The direction of the sun can affect your image too, you should not take photos with the sun directly in front of the subject but rather from behind. This is how to use a natural backlight.
Avoid bright white spots on your photos by distancing yourself from the direct light source (this is why ring lights are popular as they even out the light across your face!)
Use shadows to create contrast
The position and strength of light can affect your image. Within photography there is natural and artificial light. Natural being from the sun and artificial from studio lights for example.
Keep it still
Trying to take photos in the dark can be tricky. The camera/phone needs a longer exposure time to absorb the light and this can be difficult with a shaky hand! Investing in a tripod not only allows for a more detailed, better image but can give you a range of new techniques such as time-lapses.
Even if you don't want to invest in a tripod by simply leaning/resting your phone/camera on a table/wall can make a huge difference. It also reduces the amount of ‘noise’ in your image!
Avoid using the zoom on your phone!
Due to the lens on your phone the digital zoom reduces the quality of an image by reducing the pixel size. Even simple steps like getting closer to your subject can really make the quality appear much more high definition than zooming in.
You don’t have to be a professional photographer to take a good photo that’s for sure! Next time your out and about try practicing some of the above steps and see if it makes a difference!

I actually took this picture on my iPhone and not my DSLR and it is surprisingly one of my favourite photos.
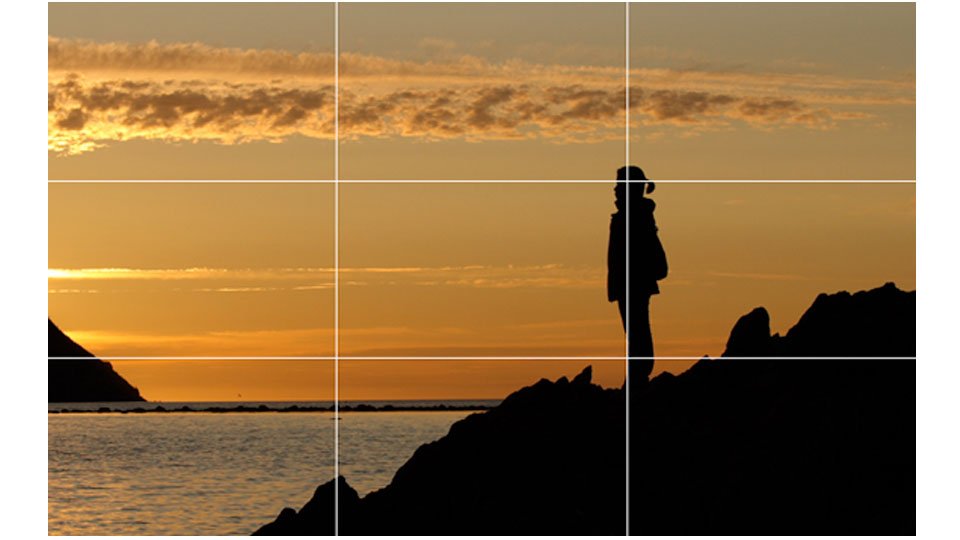
This example taken from: bhphotovideo.com shows a clear example of the ‘rule of thirds’